This week I diligently used my photoshop ninja skills to create 3 new compositions from mid to full body portraits that were kind of plain. The techniques range from retouching faces to creating backgrounds from multiple sources/places. Hope you like the results and the original photo’s are posted at the bottom of this post.
Click for full size
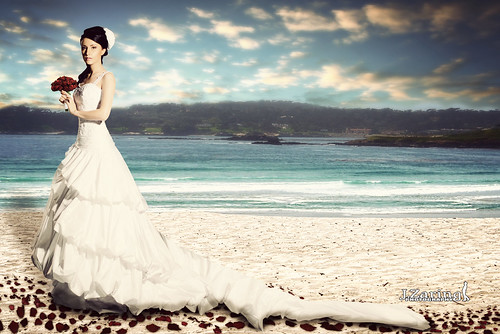
“Ocean Breeze”
Here’s my general workflow:
1. Cut out bride in photoshop and remove any color spill from original background.
2. Extend and modify dress
3. Add rose bouquet and shading layer between hands and bouquet
4. Change eye color slightly, smooth skin and perfect skin tones
5. Modify hair length and shape
6. Add rose petals underfoot
7. Draw shadows under dress, on dress and shadow cast from the rear left
8. Highlight on face: cheekbones, nose below eyebrows, chin and soft highlight on arm
9. Soft glowing highlight centered on face
10. Add slight vignette to darken edges
11. Adjust color curves
12. Add black and white gradient adjustment layer (topmost layer) using the “soft” layer blend mode
13. Construct background using 3 layers. Layer 1: Sand, Layer 2: water & mountains, Layer 3: sky
14. Blur individual background layers. Sky: Gaussian blur 56%, Mountains Gaussian blur 43%, Water Gaussian blur 28%

Click for full size
“IvyPark”
Same basic workflow as Ocean Breeze with the exception of 2 more layers for hair color changes for a lighter blonde and the red highlight. Complete color change on the eyes and lips. Background constructed of five different layers: Concrete, ivy, park, two shading layers. Then an overall circular lens blur.
Click for full size
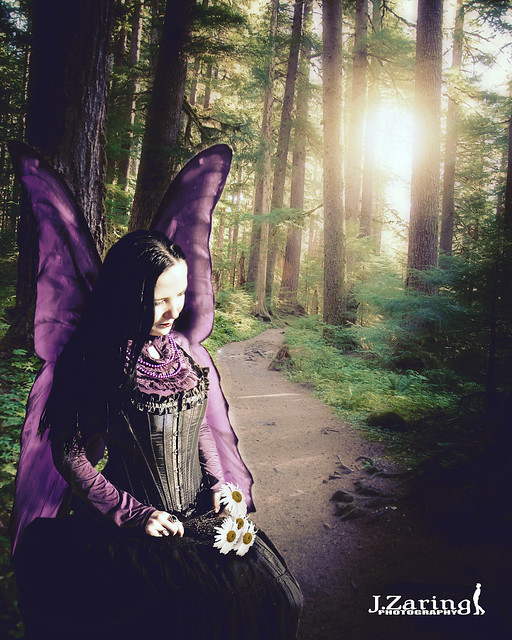
“Lady of the Forest”
Again, same basic workflow as Ocean Breeze with the exception of adding actual butterfly wings and shifting the color to match purples. Again adding flowers in her hands. Highlights in the hair and face. The background was one of my shots from RB Winter State Park with my signature sun: Paint brush orange, yellow & white center and a fourth layer with an extra large white circle all with the “soft” layer mode, followed by a lens flare. Then, an extra layer (soft) of pale yellow for the golden hour sun effect. Darken top left and bottom right for sun ray flow. Lastly, a color curve adjustment for a conversion of the darkest shadows from black to blue for a dark haze and then a gradient adjustment layer from black to white, layer mode “soft”
You’ll notice I use a lot of the soft adjustment layer because it is more subtle and lends the composition toward being more realistic.
All three “before” photo’s:

See you all next week and thanks for reading!
J. Zaring is a professional photographer and music producer/musician with a studio in Central Pennsylvania.
He can be reached at his website :
As well as popular social networking sites:
http://www.facebook.com/jzaringphoto
http://twitter.com/jzaringstudios
http://www.youtube.com/jzaringstudios
http://www.flickr.com/jzaringphoto
